UpdateHub: Enabling in the Zephyr Project


In the previous article, UpdateHub: Sending OTA Updates Using the Yocto Project, we explored how to integrate the UpdateHub to your Yocto Project-based image. In this article, we will see how to use the UpdateHub with a Zephyr Project-based application.
Requirements and Dependencies
This tutorial was run on a Debian/Ubuntu-based operating system, and the application on the NXP device FRDM-K64F (Freedom Development Platform for Kinetis® K64) with the Zephyr Project version 1.14.
You can use other operating systems and other devices (remembering that devices must have a functional connection to the Internet), you just need to adjust the settings for your device and build environment.
This tutorial was designed for you to perform each step on the same terminal, so it will contain all the necessary environment settings. Therefore, it is not necessary to open multiple terminals, just use the terminal in the ~/ directory to execute the proposed commands.
To perform this tutorial it is necessary to install on your computer some dependencies such as Zephyr Project and the west tool.
Obtaining the Zephyr Project it is very simple, below we will show you how to do the installation and configuration, for this just follow the commands. The rest of the tutorial considers that the Zephyr Project directory will be in ~/zephyr.
First we will install west on your system, with the following command:
pip3 install --user westUpdateHub is currently close to being integrated into the official Zephyr Project repository, as can be seen in this Pull Request. For now we can use UpdateHub through our UpdateHub/Zephyr project fork which maintains a backport of the patches to the 1.14 version. You can download our fork with the following command:
west init -m https://github.com/UpdateHub/zephyr
After downloading the repository we need to install the Zephyr Project dependencies:
pip3 install --user -r ~/zephyr/scripts/requirements.txt In this step we will download the zephyr-sdk through the command:
wget https://github.com/zephyrproject-rtos/sdk-ng/releases/download/v0.10.0/zephyr-sdk-0.10.0-setup.run To install zephyr-sdk, just run the command below. One tip is to keep installing the SDK in the default /opt/zephyr-sdk/ directory.
sh zephyr-sdk-0.10.0-setup.runLast step is the configuration of the build environment, with the following command:
source ~/zephyr/zephyr-env.shYou can see the getting start guide explaining its tools of Zephyr Project.
Next, we will prepare the MCUboot. MCUboot is a secure boot loader for 32-bit MCUs, in this tutorial we will use JuulLabs-OSS/MCUboot. For the rest of the tutorial the MCUboot directory will be found in ~/mcuboot. Just clone this repository on your computer.
git clone https://github.com/JuulLabs-OSS/mcuboot.git
After the repository is cloned, the MCUboot dependencies must be installed:
pip3 install --user -r ~/mcuboot/scripts/requirements.txtNow we need to install the UpdateHub utilities (uhu). The uhu is an interactive prompt and command line utility for managing update packages for the UpdateHub agent. Downloading uhu is very simple, just run the following command:
pip3 install --user uhuFinally we need to install the pyOCD which is an open source Python package for programming and debugging ARM Cortex-M microcontrollers, it will be used in this tutorial. To Install, type the following command:
pip3 install -U --user pyocdFlashing MCUboot’s image at device
The first step to starting the application is to write the MCUboot image file to the device. This can be done in several ways, to make it easier we will use the west command. In the MCUboot directory, cloned on your computer, navigate to ~/mcuboot/boot/zephyr and edit the prj.conf file, the CONFIG_MULTITHREADING option from n to y. After this change we can compile the image of MCUboot and write to the device, to do this simply execute the following commands on your terminal at home directory:
west build -s ~/mcuboot/boot/zephyr -d build-mcuboot -b frdm_k64f
west flash -d build-mcuboot
After this command the device will already be running the MCUboot image.
Modes to run UpdateHub in the Zephyr Project
UpdateHub has two different update modes at Zephyr Project, one manual and the other automatic.
The manual mode allows the user to control the update flow, the user is in charge of defining in his application the moment he wishes to query for an update and, if one is to be performed.
The automatic mode, UpdateHub will start working in parallel with the application and will automatically query the server if there is any update available, within a predetermined time, with updates will automatically install and start the device.
The example application shows how to use both examples, but by default the application is set to use automatic mode, which makes it easier to search for updates. If you want to use the manual mode just make a change in the configuration file.
Starting the UpdateHub server
By default, the UpdateHub application is configured to start in the UpdateHub Cloud. This server has the option of using CoAPS/DTLS. In this tutorial we will use the open-source server, called Updatehub Community Edition (updatehub-ce).
You can use updatehub-ce to do your tests and run everything locally. The rest of the tutorial will be based on this server. To use updatehub-ce, just run the following command on a terminal:
docker run -it -p 8080:8080 \
               -p 5683:5683/udp \
               --rm updatehub/updatehub-ce:latest
Using this server you need to create your own overaly-prj.conf option, navigate to the application example in ~/zephyr/samples/net/updatehub. Create the overlay-prj.conf file, following the overlay-prj.conf.example model, configuring the CONFIG_UPDATEHUB_SERVER option with your local IP address, and the CONFIG_UPDATEHUB_CE option must be enabled. The CONFIG_UPDATEHUB_POLL_INTERVAL and CONFIG_UPDATEHUB_PRODUCT_UID settings can be kept the same as the overlay-prj.conf.example values.
Building UpdateHub application
In this step we will show you how to compile the UpdateHub application for the fdrm_k64f device. You should be in the following directory ~/ and run the command below.
west build -b frdm_k64f -s ~/zephyr/samples/net/updatehub \
           -d build-updatehub \
           -- -DCONF_FILE="prj.conf overlay-prj.conf"
Signing the builded image
In order to maintain security for the user, the images must be signed with the same key defined at the MCUboot startup. If the image is not signed or the signature key is wrong, MCUboot does not let the image to be written to the device.
The command below creates an image file named zephyr.signed.bin and saves it to the directory its current directory. This image will be recorded on the device later.
west sign -t imgtool --no-hex \
          -d build-updatehub/ -- \
          --key mcuboot/root-rsa-2048.pem \
          --version 1.0.0+0 \
          --pad
Flashing the signed image of the application on the device
Upload the zephyr.signed.bin file to your device, type the following command:
west flash -d build-updatehub --bin-file zephyr.signed.bin Gerando a imagem de atualização
At this stage of the process you will create a signed image that will be used to update your device. In this case, we will sign the same binary previously created just by changing the version, from 1.0.0 to 2.0.0. To do this, simply execute the command below:
west sign -t imgtool --no-hex \
          -d build-updatehub/ -- \
          --key mcuboot/root-rsa-2048.pem \
          --version 2.0.0+0 \
          --pad
O this command creates an image file named zephyr.signed.bin in its current directory.
Build your package using UpdateHub Utilities
Building a package using uhu is very simple, the first step is to configure the product-uid of the package (even defined in the configuration of the image in the overlay-prj.config file), add and set the package mode, inform the image version, add the supported hardware, and finally, you must generate the package.
To perform all of the above steps simply use the following command:
uhu product use "e4d37cfe6ec48a2d069cc0bbb8b078677e9a0d8df3a027c4d8ea131130c4265f" && \
uhu package add zephyr.signed.bin -m zephyr && \
uhu package version 2.0.0 && \
uhu hardware add frdm_k64f && \
uhu package archive --output  example.pkg
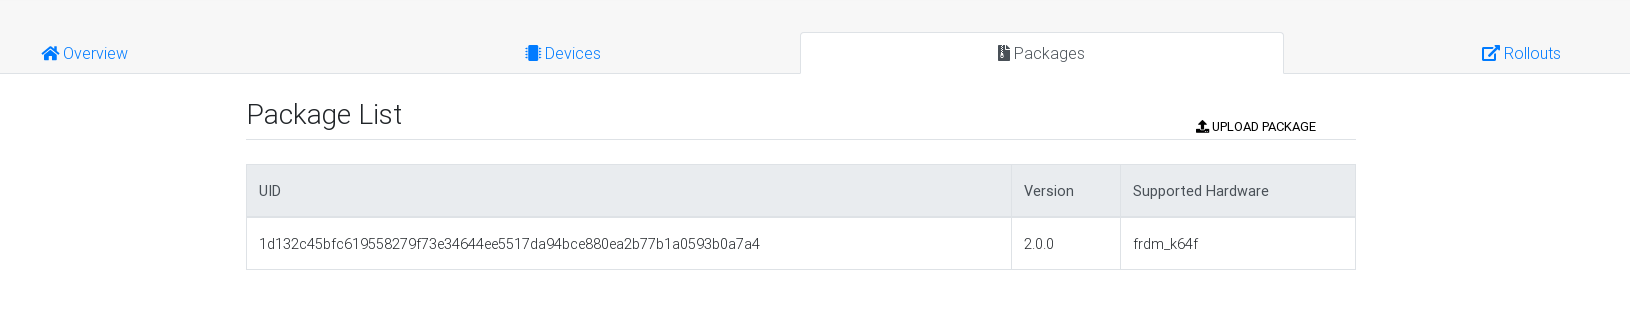
The above command creates a package file named example.pkg and saves it to the current directory.
Adding the package to the server
Package created, we are now ready to add the package to updatehub-ce. Open your browser and type the server’s URL (for example <your-ip-address>: 8080), it will open a login page, by default login and password must be filled in by admin, fill in the fields and press login.
After accessing the server, click the Package menu, then Upload Package, and browse to your computer for the example.pkg package you created in the previous step.
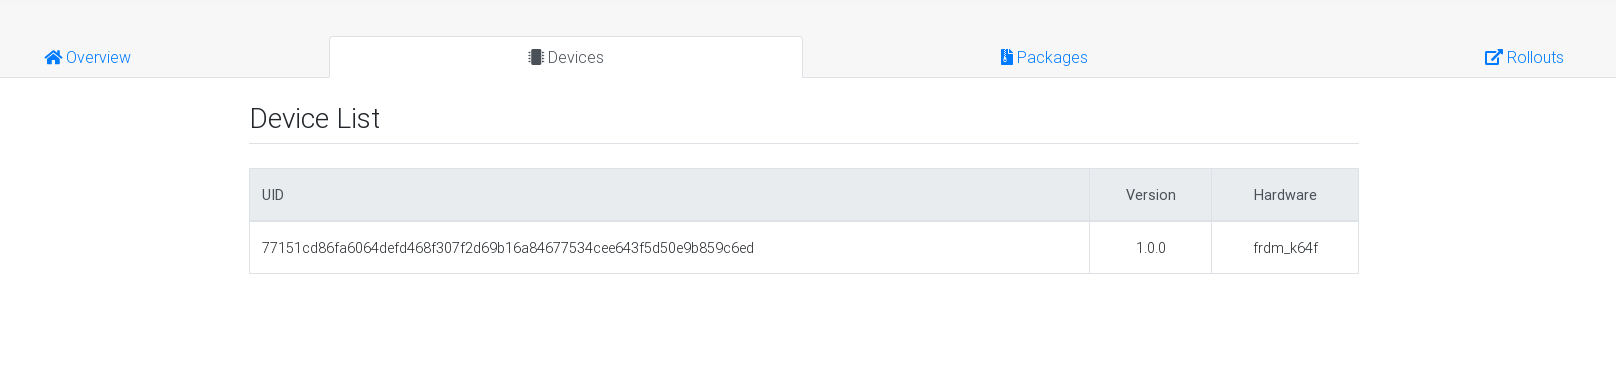
Registering the device on the server and creating a Rollout
In order for us to update the device with the image we added in updatehub-ce it is necessary to create a Rollout. To create it first you need to register the device on the server. There are two ways to do this, the first is to wait for the application to perform automatically in the predefined period (if you are using the automatic UpdateHub application), in this example the timeout set is the one-minute intervals (as defined in the overlay-prj.config file). The other way to register the device on the server is by typing the following command into the debug terminal of the device: (Probably the device will already be registered since we are using automatic server query mode).
updatehub runReturning to your browser, where updatehub-ce is open, you can navigate to the Devices tab and you will notice that your device information will be there, so you can create a rollout.
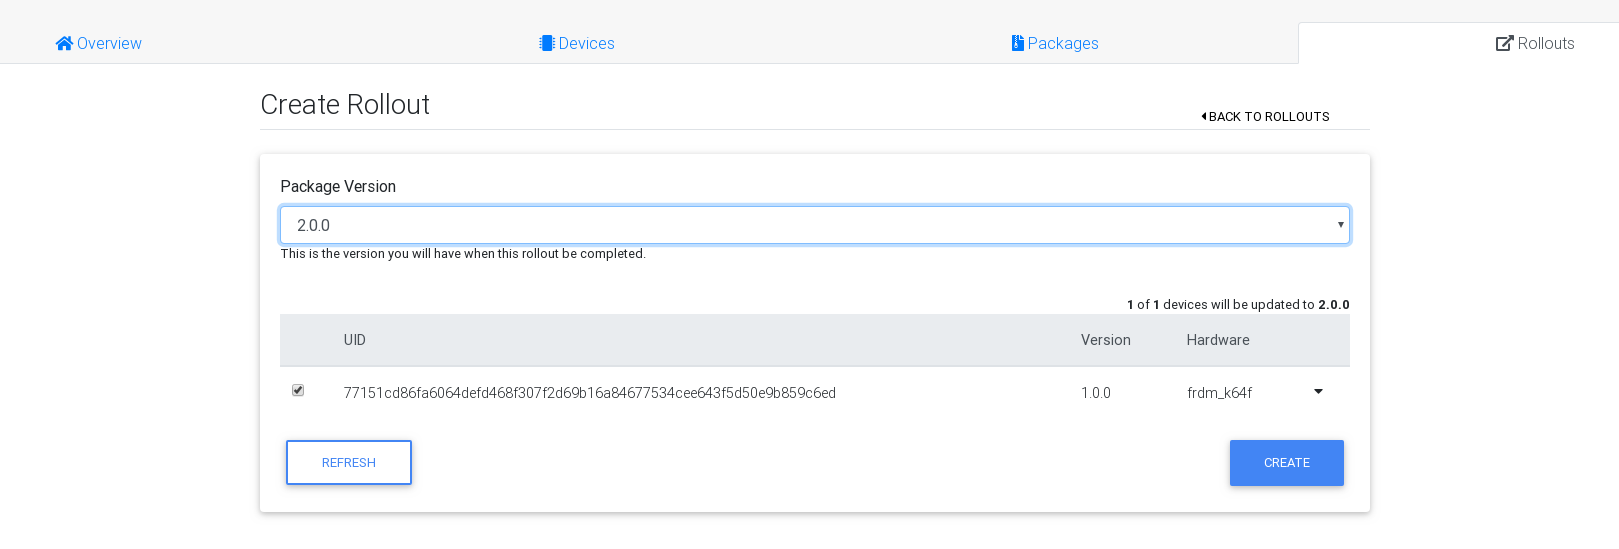
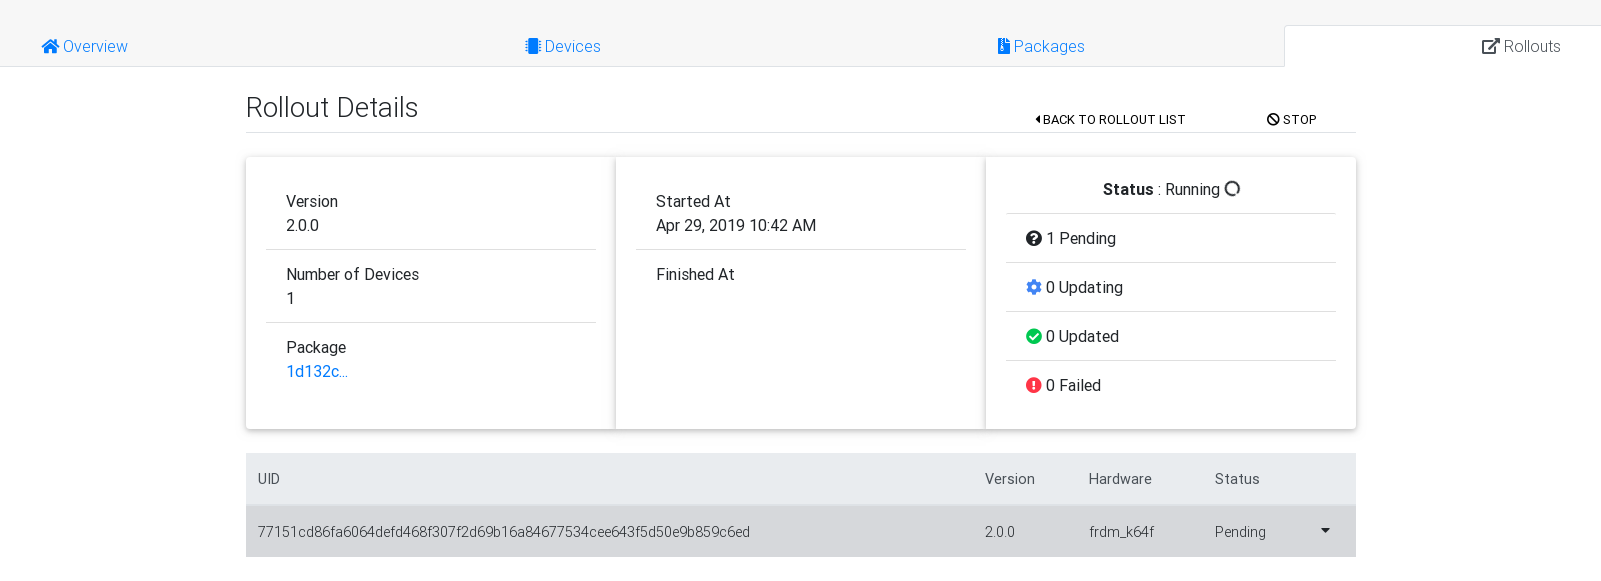
Navigate to the Rollout tab, click Create Rollout and select the version of the package you added (2.0.0), and then click Create. It will open a screen with the details of the Rollout, and just below it has the status information of the rollout, initially the status will be as pending.
Updating the device
Now everything is ready to update the device with the image available on the server. The update can be performed in two different ways, automatically by the application or through the console shell.
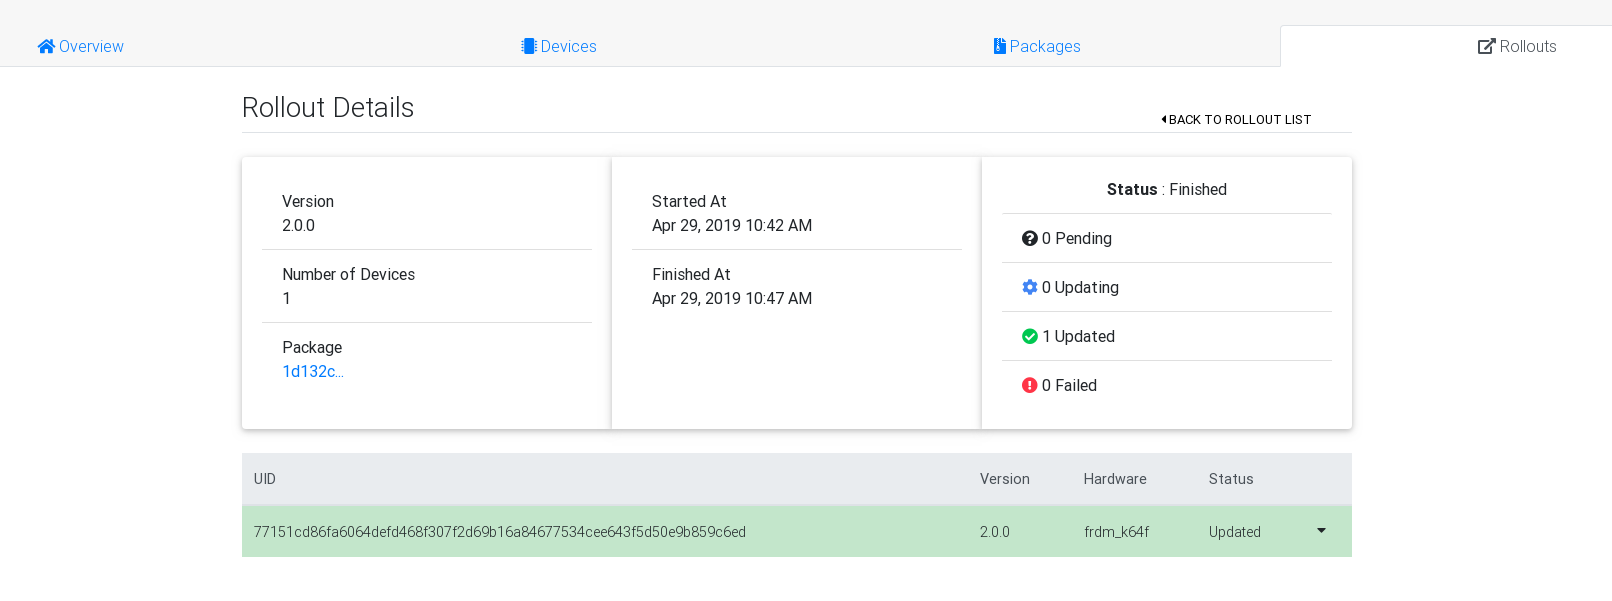
This tutorial, as we said before, uses the automatic query mode, where the device makes a query to the server checking if it has any update, getting answer that there is an update to be performed, it will automatically start downloading and install the image, finally device. When the device boots with the new image it will automatically query the server for more updates, the server will return to the device that there are no more updates and the Rollout will be set to Updated.
You can choose the second update mode where you can manually query by typing in the debug terminal of the device the command:
updatehub runThe device will download, install the new image and at the end the message "Image flashed successfully, you can reboot now" will appear on the screen, so you can restart the device by executing the following command in the terminal device debugging:
kernel reboot warmThe device will boot to the new image and query the server if there is any other update, the server will return to the device that has no more updates and the Rollout will be set to Updated.
Until the next article, feel free to contact us if you have any questions or suggestions through our email contact@updatehub.io, or through our channel at gitter.im/UpdateHub.